|
|
Post by 3DprintedLife on Apr 9, 2016 2:19:57 GMT
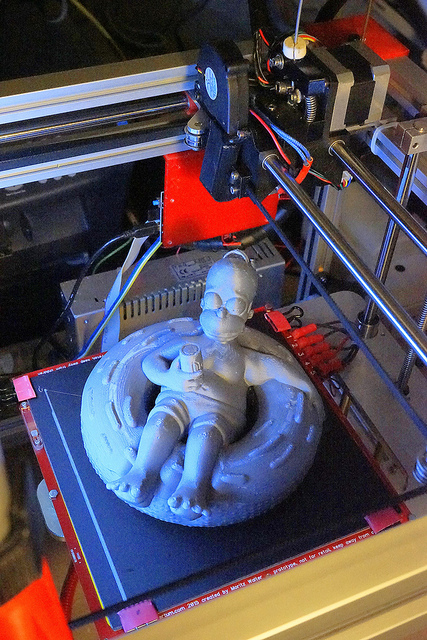
Nice creepy alien thing! And awesome I'd love to see someone elses attempt at this print. I'd highly recommend using Cura to slice it, as slic3r just kind of crapped out when I tried. Also, the model is a bit messed up and is huge, so if you'd like I can post the STL I used, it should save you a bit of time and frustration. That would be if you can share the stl I'm all down for saving time especially if I'm going for a 30 hour print! Hopefully I'm not biting off more than I can chew on this lol Sure thing, unfortunately the file is on my computer at work but I'll get it to you first thing monday. If you want it before then, basically I did a mesh repair in netfabb, then simplified it using meshlabs, then repaired it again in netfabb and had to do some manual deletion of some random polygons! |
|
|
|
Post by rock75 on Apr 17, 2016 2:31:12 GMT
Been working on learning some new techniques to add to the printing, mold making and resign casting. Here is my first go at cold casting with metal powders and resign. The original print on the left, printed at .08 layer height and 185* with Hatchbox Black PLA. The middle is a bronze casting, lightly buffed and finished with #0000 steel wool. On the right is an iron casting, I accelerated the rust effect with a bath of bleach and vinegar then a light buffing with #0000 steel wool. I can't be more impressed with the level of detail captured by the silicone mold. I think this turned out great. Next step is to drill a hole in the bottom, add some threads and turn it into a gearshift knob. Cheers, Rock Attachments:
|
|
|
|
Post by 3DprintedLife on Apr 17, 2016 3:53:49 GMT
Been working on learning some new techniques to add to the printing, mold making and resign casting. Here is my first go at cold casting with metal powders and resign. The original print on the left, printed at .08 layer height and 185* with Hatchbox Black PLA. The middle is a bronze casting, lightly buffed and finished with #0000 steel wool. On the right is an iron casting, I accelerated the rust effect with a bath of bleach and vinegar then a light buffing with #0000 steel wool. I can't be more impressed with the level of detail captured by the silicone mold. I think this turned out great. Next step is to drill a hole in the bottom, add some threads and turn it into a gearshift knob. Cheers, Rock Wow!!! The print looks awesome but those casts look even better!! The detail is incredible, very impressive! |
|
|
|
Post by 3DprintedLife on Apr 20, 2016 1:12:12 GMT
|
|
|
|
Post by rock75 on Apr 20, 2016 3:26:29 GMT
Sweet! Thanks Andrew. Simplify3d had no problems slicing and dicing lol. It loaded up at 100 mm tall and that is going to take almost 13 hours at .08 layer height and 50mm/s. so I just left it like that  I just don't have the patience to wait 30 hours yet lol. And I kind of have this crazy fascination to see how small and detailed a print can be. Here is a little miniature doll chair I printed a while ago. I will be sure to post up some pics tomorrow if all turns out well. Cheers- Rock Attachments:
|
|
|
|
Post by jjlink on May 4, 2016 14:27:28 GMT
|
|
|
|
Post by jjlink on May 20, 2016 22:38:56 GMT
|
|
|
|
Post by animoose on Jun 29, 2016 3:33:04 GMT
|
|
bpopilek
Junior Member
 Wax on, Wax off...
Posts: 95 
|
Post by bpopilek on Oct 5, 2016 19:46:01 GMT
|
|
|
|
Post by macgyver03 on Nov 18, 2016 2:28:29 GMT
I just got done gluing the model together, but its pretty nice considering the detail in the individual items   |
|
|
|
Post by rock75 on Nov 19, 2016 4:14:01 GMT
Well, after 40-50+ hours of printing, this is close to done. I printed out the new version of the MPCNC from Thingiverse. I had printed it before in PLA, but before I could even finish wiring it up, many of the parts had cracked due to the strain on the PLA. This time around I used Red Orb PETG, and it seems to be very strong! At this time, I have to finish wiring it up, but it is built and should be a lot of fun when I get it finished!   Here is the Z Axis piece, next to an xBox One game for size comparison! It is massive!   Holy smokes!! That is looking Saweeet! Can't wait to see what you carve up with this bad boy. Keep us posted. By the way, how was the shrinkage with the PETG? I haven't ordered any yet but it is on my list. I just reprinted my gantry in ABS and the shrinkage kinda messed things up a bit. Cheers~ Rock |
|
bpopilek
Junior Member
Wax on, Wax off...
Posts: 95
|
Post by bpopilek on Nov 19, 2016 5:45:26 GMT
Well, after 40-50+ hours of printing, this is close to done. I printed out the new version of the MPCNC from Thingiverse. I had printed it before in PLA, but before I could even finish wiring it up, many of the parts had cracked due to the strain on the PLA. This time around I used Red Orb PETG, and it seems to be very strong! At this time, I have to finish wiring it up, but it is built and should be a lot of fun when I get it finished! Here is the Z Axis piece, next to an xBox One game for size comparison! It is massive! Holy smokes!! That is looking Saweeet! Can't wait to see what you carve up with this bad boy. Keep us posted. By the way, how was the shrinkage with the PETG? I haven't ordered any yet but it is on my list. I just reprinted my gantry in ABS and the shrinkage kinda messed things up a bit. Cheers~ Rock I have not had any issues with the PETG shrinking. The PLA I used before cracked and broke without ever turning the machine on. I tried printing some parts in ABS, but the layer adhesion sucked! I think you souk find that PETG is the best choice! |
|
|
|
Post by rock75 on Nov 19, 2016 12:13:40 GMT
Sounds great bpopilek! Just ordered a couple rolls and will give it a go.
Thanks!
Rock
|
|


 I just don't have the patience to wait 30 hours yet lol. And I kind of have this crazy fascination to see how small and detailed a print can be. Here is a little miniature doll chair I printed a while ago.